Sunday, 21 September 2014

Strawberry shortcake birthday party

Well, birthday season in our house has come and gone for another year and although it all happened a few months ago I am only just getting around to blogging about the celebrations.

I will start with the first birthday, my eldest daughter's 6th birthday back in March. There are more birthdays in March in my family than I can count on one hand and in the space of under 3 months we celebrate the birthdays of all three of my children. So its a very busy time in our house.

This year my eldest daughter decided on a Strawberry Shortcake theme for her birthday. It's not one of her favourite characters but one she enjoys occasionally. I was happy to embrace it as I already had lots of ideas for cakes, food and decorations from my web browsing last year (before she decided on a Little Mermaid theme for her 5th birthday).

For the invitations, I found a lovely strawberry-theme template online and customised it for our party. It was predominantly red with white dots, which worked well for a party where we invited both girls and boys from school, but was still girly enough for my daughter's liking.

For the cake, I wanted to make a strawberry flavoured cake, so I hunted for recipes online. I tested out a few different types in the month leading up to the party, until I found the perfect one. The first one that I made used strawberry puree and it was nice enough but lacked a bit of punch in terms of flavour and colour. The next one I tried was amazing - it used both strawberry puree and strawberry flavoured jelly crystals, giving it a good strawberry flavour and colour. Plus it was moist and fluffy, not heavy or dense, and very easy to make.

The recipe I used was this one: Sweetapolita's Strawberry Layer Cake. I made the cake batter according to the recipe, but I used 4 x 9inch tins instead of 3 (to get slightly shorter layers) and I used red gel food colouring to make each layer slightly darker than previous one to get an ombre effect once the cake was assembled (see pics below). I wanted to make the layers fairly equal in height without needing to do any trimming so I worked out the weight of the batter - to do this I weighed my mixing bowl before I started, and then weighed it again once the batter was complete. I subtracted the bowl weight from the total weight to give the weight of the batter, and then divided that amount by 4 to give the amount of batter for each of the 4 cake tins. I added a small amount of the red colour to the whole bowl of batter and mixed it in, then poured the calculated amount (ie 1/4) of batter into the first cake tin. Then I added a bit more red colour to the remaining 3/4 of batter to make it darker, and poured the same amount (ie 1/4 of the original weight) into the second tin. Repeat twice more for the remaining batter and cake tins. I also shortened the baking time as the layers were smaller than in the recipe. This is how it looked before the icing went on:


My daughter helped to choose the decorations for the cake - we found two different cakes that she liked (this one was the main inspiration but this one helped too) and then I used elements of each one to give the end result. Unfortunately being March in Brisbane, the weather was very humid on the night before the party when I was trying to assemble the cake. The fondant strips kept stretching out of shape and overall while I was happy with how it looked, it didn't look as professional as I was hoping it would be. But my little girl loved it, and that's the main reason why I spend my time creating something special.


I'm not a big fan of covering cakes completely in fondant (as I don't like eating it), so I used vanilla buttercream icing to cover the cake and added the fondant decorations. The lettering for the name was made using the FMM Tappits cutters with white fondant. I cut the red plaque freehand using a template I printed off my computer, and the green scallop border and the scallops on the top of the pink strips were both cut with the FMM Straight Frill cutter. The flowers and leaves were cut using some small metal flower and leaf cutters (with a hand rolled ball for the yellow centre), and the large pink flower on top of the cake was cut with a large plastic cutter I got from a discount shop. I cut the number 6 with a large metal cutter and then used the point of a toothpick to make the stitching effect around the edge. The green tendrils were rolled out using a fondant smoother and then curled around a pencil while they dried. The strawberries were made by hand using a toothpick to make the seed marks, and a flower cutter was used to make the green leaves at the top of the strawberry. The Strawberry Shortcake figurine was one that we've had at home for a while, and the Pupcake and Custard Cat figurines came from a Strawberry Shortcake book that I found at Big W about a week or so before the party.  


Here's the inside of the cake with the ombre strawberry flavoured layers:


I continued the strawberry theme through some of the other party food too - I made a yummy Strawberry Jelly Slice (recipe here) which turned out much better than I expected - the recipe uses low-joule jelly for both the yogurt-based filling and the jelly layer on top. I haven't used low-joule jelly before but I thought I would follow the recipe and see how it turned out, and it was a brilliant result. I think the low-joule jelly gives the slice a firmer result (even when left out of the fridge during the party) than normal jelly which I think would melt a bit more when left out of the fridge.


I also made some chocolate strawberry pots using chocolate instant pudding for the choc layer, topped with fresh strawberries and mini meringues on top. I actually wanted to use a paleo chocolate mousse (the same as I used in my Healthy Chocolate Tarts) for these little choc pots but I put too much cacao in the mixture and when she tasted it on the morning of the party, my daughter screwed up her face and said "Mummy, I do not want you to bring that to my party." I kinda agreed with her on the strong taste and remembered I had a packet of instant pudding in the cupboard so I pulled that out for a last-minute rescue.


I also did some strawberry-themed decorations for the party. I had bought a red heart garland and added some green leaf-shaped paper to the top to create a strawberry garland:


I also made some giant strawberries using some red hot-air balloon shaped lanterns by removing the bottom "basket" section and adding some green leaf-shaped paper:


By the end of the day we were all strawberried out with a very happy little 6 year old. But I had one last strawberry-themed task left: cupcakes for school the next day. This is how they turned out (with some help from my little girl):


Friday, 21 February 2014

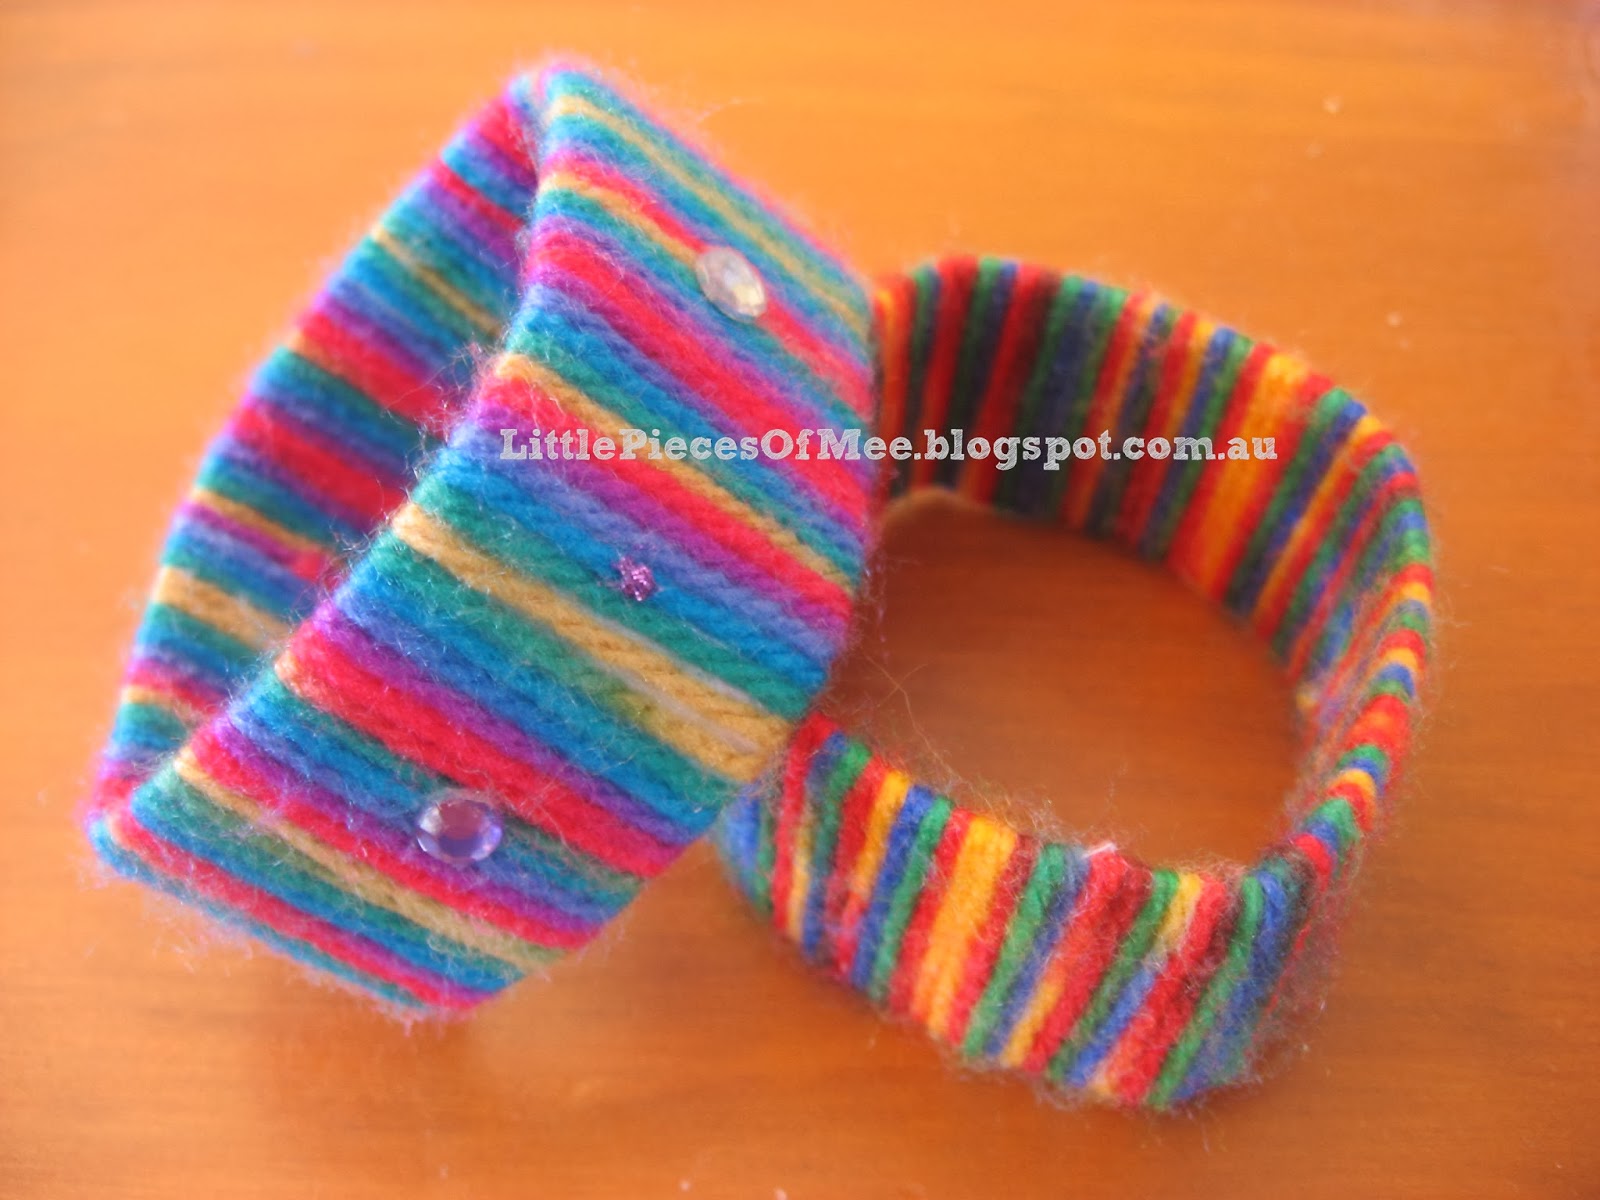
Craft kids woollen bangles

On the weekend my nearly-6-year old wanted to do something crafty so after much googling we came across a photo of a kit to make bangles wrapped with wool.

 
We didn't have any bangles that we could use, so we improvised. I hunted through our recycling pile and found some empty, clean kids yogurt tubs and worked out that if I cut the top and bottom off they would be perfect for the job.


I gathered my supplies: a ball of wool (I used a ball of multi-coloured wool, but you could use a solid colour or a few different colours), some scissors, sticky tape and the cut-down yogurt tub. 


I started by sticky taping the end of the wool to the inside of the bangle, and then my little munchkin wrapped the wool around the bangle. I held the wool that she had wrapped so that it stayed taut and we kept going (and going) until we got all the way back to the start. 


If you run out of wool part way, or want to change colours, to attach a new piece just tie the two pieces together so that the knot sits at the back of the bangle and then keep wrapping. As you wrap the wool, tuck the tails under the wool so that you can't see them.


When you get back to the start, tie the end of the wool into the first string and tuck the ends in under the wool so they don't stick out.


If you want, you can decorate the bangle with glitter glue, gems, etc. Or just leave it as is.


Saturday, 15 February 2014

Travelling hearts card

A few days before Valentine's Day I saw a gorgeous heart map wall art on the web and thought that it would make a perfect idea for a Valentine's Day card for my hubby. This is how it turned out:
 

I started by finding maps on Google Images of different places that are special to both of us - places we have travelled to together over the last 15 years, and the place we call home. In Word I set up a blank page with 9 identical hearts (no fill, just a black outline), spaced roughly the way I would put them on the finished card (see tip below), and then one by one I copied each map image into the Word document and resized it until it fit perfectly inside one of the heart outlines. I made sure for each map that you could read the name of the place  I then printed the page of maps on white cardstock and cut out each heart shape. I cut inside the line of the heart so that you couldn't see it on the cut out hearts. I then folded each heart in half (so the fold line goes from top to bottom) and glued the fold line of each heart onto my card. Having the fold in the hearts allows them to sit up for a 3D effect.


I was so happy with the end result, and I think my hubby was impressed too - even more so when he realised the significance of each of the maps.

This would also make a great birthday card for someone who loves to travel or is about to set off on a trip.

Here's a tip for working with Word when making cards: using the Print Layout view (ie where you can see a white area representing the printed page, with a grey border around the outside), hold a sheet of paper up to your screen and adjust the zoom until the size of the document on the screen matches exactly to your piece of paper (on my computer it's 107%). Then you know that whatever is on the screen will print at pretty much that size - this is great for lining up text and/or images to a particular spot on your paper, or getting something the right size to fit a particular card size.


Thursday, 13 February 2014

Raw lime slice

It was a pretty hot day here and it was my turn to host our weekly mothers' group gathering. I wanted to make something healthy and summery without needing to spend time in the kitchen next to a hot oven. I remembered seeing a recipe in the Woolies magazine a few months ago for a raw lime pie, so I found the recipe and decided to make it in a slice pan instead of a round springform pan. This way I could cut it into smaller pieces so the kids could sample it if they wanted to, and us mums could have one piece or three, without feeling guilty.

The end result was pretty good, maybe a bit too strong on the lime flavour (but my limes were on the larger side). I think next time I will cut back a bit on the lime juice and maybe add a bit of extra honey to balance the flavours a bit more.

Just a warning though - this is best served within half an hour of removing it from the freezer otherwise it will melt and is very difficult to eat without a spoon.

I have the leftovers stored in the freezer for some guilt-free snacks/desserts. This is free from dairy, gluten, egg, and refined sugar, and very easy to put together. You just need about 15 mins prep time and a couple of hours to freeze before serving.


Sugar free raw lime pie

Preparation time: 15mins
Cooking time: nil

1 cup walnuts
1/2 cup fresh pitted dates
1/2 cup of cocoa
2 avocados
3 limes
Zest of 1 lime
1/4 cup manuka honey
1/4 cup of organic coconut oil

Line base of a round 20cm springform tin (or an 18cm x 28 cm slice pan) with baking paper. Process 1 cup walnuts, 1/2 cup fresh pitted dates and 1/2 cup of cocoa in a food processor until crushed.

Press mixture firmly into base of the tin and freeze. Meanwhile, process flesh of 2 avocados, juice of 3 limes, zest of 1 lime, 1/4 cup manuka honey and 1/4 cup of organic coconut oil in food processor until smooth. Pour over base and freeze until set.

Remove 30 minutes before serving. Cut into wedges and top with frozen berries to serve.

Thursday, 19 December 2013

Mini Christmas cheesecakes

Christmas preparations are well underway in our little household. We have been doing lots of Christmas crafts (which I will hopefully do a post on in the next few days) and I have been cooking lots of yummy Christmas treats. In the last week I've made apricot balls, ginger balls, rocky road, two batches of caramel fudge, and some gingerbread men. I love being able to spread some Christmas cheer through food!

Today's creation is some mini cheesecakes that I cooked for our mothers group Christmas party. 


I had seen a recipe for a very cute gingerbread cheesecake which had a gingerbread biscuit base, gingerbread flavoured filling and some gorgeous little gingerbread men on top. I wasn't sure whether the three lots of gingerbread would be a bit too much for some, so I decided to make mini cheesecakes and do half with gingerbread flavoured filling and half with a plain filling (I followed the recipe up to the point of adding the eggs, and then I divided the mixture in two equal parts and added half quantities of the golden syrup, spices and lemon zest to one half, and just the lemon zest to the other). Next time though I think I'll just make them all gingerbread flavoured as it was so yummy. As there would be kids at the party as well as us mums, I did some in mini cupcake cases and some in the regular size cupcake cases.

I topped them with mini gingerbread men, stars and trees. I stood the biscuits up on top as I thought that was more effective than lying them down for the individual ones.

I was really happy with the results - the gingerbread flavoured ones weren't overpowering at all - just the right amount of spice. The filling was a beautiful silky texture and the gingerbread crust was amazing. I modified the recipe a bit from the original, and used a different recipe for the gingerbread (which doesn't need beaters to make) so here is my version:


Gingerbread Cheesecake
Makes 24 mini cupcakes

Bases
Gingerbread dough (see next recipe)
80g unsalted butter, melted
1/4 cup caster sugar

Filling
3/4 cup caster sugar
500g cream cheese, at room temperature
1/2 tsp pure vanilla extract
2 large eggs, at room temperature
30ml golden syrup
1/4 tsp salt
3/4 tsp ground ginger
1/2 tsp ground cinnamon
1/2 tsp freshly grated nutmeg
1/4 tsp ground cloves
1/2 tsp finely grated lemon zest
24 mini gingerbread men/stars/trees(from recipe below)

Preheat oven to 180C. On a piece of baking paper, roll half of the Gingerbread Cookie dough into a rectangle, about 5mm thick.  Slide dough and parchment onto a baking sheet.  Bake until firm and golden brown, about 14 minutes.  Let cool completely on sheet on a wire rack.  Break into large pieces, then pulse in a food processor until finely ground.
 
Use the other half of the gingerbread dough to make mini gingerbread men, stars and trees. Bake until firm and golden brown, about 10 minutes.

While gingerbread is baking, line two 12-hole standard size muffin trays with paper cases.

Combine butter, 1/4 cup sugar, and 2 cups of gingerbread cookie crumbs in a bowl.  Press a heaped tablespoon of mixture firmly and evenly into the bottom of each paper case (use the back of a spoon or a small glass or other flat-bottomed container to get an even top).  Bake until set, about 10 minutes.  Let cool on a rack.

Reduce the oven temperature to 170C.  Beat cream cheese in the bowl of an electric mixer on medium speed until fluffy, about 3 minutes.  Beat in sugar and vanilla, scraping down the sides of the bowl as needed.  Reduce speed to low.  Add the eggs, 1 at a time, beating well after each addition and scraping the sides of the bowl as needed.  Beat in molasses, salt, spices, and lemon zest.  Pour the filling in the prepared and cooled muffin pans.

Bake until cheesecakes are set bull still slightly wobbly in the center, around 20 mins. Remove from the oven and allow the cheesecakes to cool down to room temperature on a wire rack, about 1-2 hours.  Remove cheesecakes from muffin trays and place into a covered container or cover with plastic wrap and refrigerate for at least 8 hours (preferably overnight).

Before serving, add a gingerbread biscuit to the top of each cheesecake, and serve immediately.


Gingerbread dough

3 cups plain flour
1/2 tsp baking powder
1/2 tsp ground cloves
2 tsp ground cinnamon
2 tsp ground ginger
125g unsalted butter
3/4 cup golden syrup
1/2 cup brown sugar
1 egg
Sift flour, baking powder and spices into a medium bowl. Melt butter, golden syrup and brown sugar together until smooth.
Add to flour mixture with egg and stir until combined. Divide dough in half, wrap in plastic wrap and chill for 20 minutes.
If making the gingerbread cheesecake, continue to follow the cheesecake recipe above, otherwise if just making gingerbread biscuits use biscuit cutters to cut out shapes as desired. Carefully lift onto trays and bake at 180C for 12-15 minutes.


Thursday, 24 October 2013

Chocolate Overload Cake with KitKats and M&Ms

A few weeks ago for my sister-in-law's birthday I made her a chocolate cake that was surrounded by KitKats and topped with red M&Ms (red being her favourite colour). It was chocolate heaven! I don't know if these cakes have an official name but I'm going to call it Chocolate Overload Cake. Here's a pic of the finished cake:


I have been looking for a good chocolate cake recipe for a while, so this was a good excuse to test out a few different recipes in advance of the official cake baking. The first one I made was moist and had a good chocolate flavour but it reminded me too much of a packet mix chocolate cake - and if I'm going to spend time measuring and mixing then I want it to taste like I've made it from scratch. However, the chocolate icing from that recipe was fantastic - definitely a recipe to keep and use again (see below). So like Goldilocks I moved on to recipe number two, an almond-meal based cake which was quite dense. Because of the height of the KitKats I would need to layer two cakes together and I thought that two layers of this particular cake would be a bit too rich (even for a chocolate lover). I needed something that was light but still had a big chocolate flavour. Then I came across a recipe for David Lebovitz's Devil's Food Cake. I had never made a devil's food cake before so I wasn't sure how it would go, but when I made this one I was really happy with the way it turned out and knew that this would be my new favourite chocolate cake recipe. Goldilocks had found the one that was just right.

For the KitKat cake, I made two separate cakes as per the recipe. I used water instead of the coffee as I'm not a fan of coffee flavour. I used chocolate icing (see below for recipe) for the outside of the cake (rather than the ganache from David Lebovitz's recipe). I also made a raspberry buttercream icing (see below for recipe) to put between the two layers of chocolate cake, just to offset some of the chocolate and also incorporate a bit more red (well, pink actually) inside the cake. It tasted delicious and has a natural pink colour without needing food colouring.  

This is the fist layer with the raspberry buttercream icing :

Raspberry buttercream icing

Recipe from Raspberri Cupcakes:

125g (about 1 stick) butter, softened
250g (about 2 cups) icing (confectioner's) sugar, sifted
125g (1 punnet) fresh or frozen raspberries, pureed and strained
If using frozen raspberries, allow them to defrost (either at room temperature or in the microwave) before pureeing.
 
Place butter in a mixing bowl and beat with an electric mixer on high until smooth and fluffy. Gradually add icing sugar, beating until combined. Add raspberry puree and beat until combined. You want your icing to be stiff enough to hold it's shape but soft enough to spoon or pipe.
 
 
Once the raspberry buttercream was spread on the first layer, I added the second layer of cake. I put the cake in the fridge at this point so that the raspberry icing could harden a bit while I made the chocolate icing.
 
Chocolate icing
 
Recipe from The Caramel Cookie (Hershey's cocoa recipe)
 
125g unsalted butter
2/3 cup cocoa
3 cups icing (confectioner's) sugar, sifted
1/3 cup milk
1 teaspoon vanilla
 
Melt the butter in the microwave in a large microwave-safe bowl. Mix in the cocoa. Add in the icing sugar a cup at a time, alternating with half the milk. Add in the vanilla and beat on medium speed for 5 minutes. If the frosting is too thick, add a little more milk. 
 
 
I then iced the whole cake with the chocolate icing and then it was ready to decorate!
 
I had bought 4 of the large family packs of KitKats which have 11 bars in each. I used 3 whole packs plus two extra bars to go around the cake. I started by breaking the KitKats by hand but quickly discovered that I wasn't getting a clean break, so I switched to using a knife to cut between the bars - this was much better. When I got to the end, I couldn't quite fit a whole KitKat in the remaining space, so I trimmed the edges of the last bar to fit snugly. I could have spread the other bars out a bit more instead, but I wanted the solid look of the bars right next to each other.
 
Once the Kit Kats were all in place, I tied a red ribbon around the middle - this both covers the indent in the middle of the KitKats and keeps them all secure.
 

Then the last job was to sprinkle the M&Ms on top. I found single colour M&Ms at a confectionery store in Brisbane (they had lots of different colours to choose from, including silver and white) and used about 350g. I chose red as this is my sister-in-law's favourite colour, but you could also use the multi-colour packs from the supermarket, or occasionally you can find other colour combinations at supermarkets around Christmas and Easter.


I was very happy with the end result and I think my sister-in-law liked it too, which is the most important thing! It was very rich though so a small slice was more than enough.

Monday, 14 October 2013

Miniature passport as a cash gift holder

Recently my sister-in-law and her husband both celebrated milestone birthdays just before they jetted off for a 6 week holiday in the USA. My SIL suggested that the family put some money towards some special holiday experiences as a gift (and it was our job to suggest what those experiences might be). So my other SIL and I came up with a few suggestions of things to do with some US dollars (eg visiting Alcatraz and the Statue of Liberty) and while my other SIL organised the US dollars, I was in charge of making a card for the birthday boy and girl.

As well a as birthday card for each of them, I decided to make a little passport for each of them with pockets in each page where I could slip in each US dollar bill and then on the outside of the pocket show the "Condition of Visa" which was our holiday activity suggestion.
 

I found a photo of the cover of an Aussie passport on Google and then I also found a picture of the inner page of the passport which shows all the person's details. If I had access to the real passports I would have just taken a photo of them but I was short on time so I decided just to modify the Google image with a photo and text.

For the text, Google told me that OCR was the font used in passports so I downloaded a copy of the font and played around with the text in Word to get the right size and spacing.

For the other pages, I found some passport-type stamps (also on Google - love that website!) to use for each city that we had an activity for. I used Courier New for the font on those pages.   

The finished passport (when closed) measured about 6.2cm (2 1/2 inches) wide and about 8.5cm (3 3/8 inches) high. I think the small size really gave it a unique look and it was just the right size for a folded dollar note.

I was so happy with how the passports turned out - and I think my SIL and BIL loved them too!

Here are some photos of the project in progress:

These are the pages just after I had printed and trimmed them to size. I used white cardstock for the cover and normal A4 paper for the inner pages.


 A close-up of the cover:


And a close-up of the inner page:


When I did a test run of the pocket for the inner page, I found that using the full width of the glue runner didn't leave enough room inside the pocket for the folded dollar bills. I hate wasting things so I put two pages side-by-side and glued both in one go so each page had only half the width of glue on it.


You can also see in the photo above that I used a 1 inch circle punch to make a semi-circle at the top of the left hand side of the page - I did this on each left page to give a tab to easily get the money in and out of each pocket.
 
This is how the pages looked once they were glued together (before I attached the cover).


And another view:


The money in the pocket:


All pockets filled and ready for gifting:


The finished passport:


If you make your own version of this passport, I would love to see what you have made - leave me a comment and I will get back to you.